Estilo de un botón input type = "file"
Cómo estilizar el botón input type="file".
30 answers
Styling file inputs es notoriamente difícil, ya que la mayoría de los navegadores no cambiarán la apariencia de css o javascript.
Incluso el tamaño de la entrada no responderá a los gustos de:
<input type="file" style="width:200px">
En su lugar, necesitará usar el atributo size:
<input type="file" size="60" />
Para cualquier estilo más sofisticado que eso (por ejemplo, cambiar el aspecto del botón examinar) tendrá que mirar el enfoque tramposo de superponer un botón de estilo y un cuadro de entrada en la parte superior del archivo nativo entrada. El artículo ya mencionado por rm en www.quirksmode.org/dom/inputfile.html es el mejor que he visto.
Warning: date(): Invalid date.timezone value 'Europe/Kyiv', we selected the timezone 'UTC' for now. in /var/www/agent_stack/data/www/ajaxhispano.com/template/agent.layouts/content.php on line 61
2011-10-06 04:51:10
¡No necesitas JavaScript para esto! Aquí hay una solución entre navegadores:
Ver este ejemplo! - Funciona en Chrome / FF / IE - (IE10/9/8/7)
El mejor enfoque sería tener un elemento de etiqueta personalizado con un atributo for adjunto a un elemento de entrada de archivo oculto. (El atributo for de la etiqueta debe coincidir con el id del elemento file para que esto funcione).
<label for="file-upload" class="custom-file-upload">
    Custom Upload
</label>
<input id="file-upload" type="file"/>
Como alternativa, también podría simplemente envolver el elemento de entrada de archivo con una etiqueta directamente: (ejemplo)
<label class="custom-file-upload">
    <input type="file"/>
    Custom Upload
</label>
En términos de estilo, simplemente ocultar1 el elemento input usando el selector de atributos .
input[type="file"] {
    display: none;
}
Entonces todo lo que necesita hacer es darle estilo al elemento personalizado label. (ejemplo).
.custom-file-upload {
    border: 1px solid #ccc;
    display: inline-block;
    padding: 6px 12px;
    cursor: pointer;
}
1 - Vale la pena señalar que si oculta el elemento usando display: none, no funcionará en IE8 y versiones posteriores. También tenga en cuenta el hecho de que jQuery validate no valida los campos ocultos de forma predeterminada. Si cualquiera de esas cosas es un problema para usted, aquí hay dos métodos diferentes para ocultar la entrada (1, 2) que funcionan en estas circunstancias.
Warning: date(): Invalid date.timezone value 'Europe/Kyiv', we selected the timezone 'UTC' for now. in /var/www/agent_stack/data/www/ajaxhispano.com/template/agent.layouts/content.php on line 61
2017-05-23 12:26:38
Siga estos pasos y luego puede crear estilos personalizados para su formulario de carga de archivos:
1.) este es el formulario html simple (por favor, lea los comentarios html que he escrito aquí a continuación)
<form action="#type your action here" method="POST" enctype="multipart/form-data">
  <div id="yourBtn" style="height: 50px; width: 100px;border: 1px dashed #BBB; cursor:pointer;" onclick="getFile()">Click to upload!</div>
  <!-- this is your file input tag, so i hide it!-->
  <div style='height: 0px;width:0px; overflow:hidden;'><input id="upfile" type="file" value="upload"/></div>
  <!-- here you can have file submit button or you can write a simple script to upload the file automatically-->
  <input type="submit" value='submit' >
</form>
2.) a continuación, utilice este script simple para pasar el evento de clic a la etiqueta de entrada de archivo.
function getFile(){
     document.getElementById("upfile").click();
}
Ahora puede usar cualquier tipo de estilo sin preocuparse de cómo cambiar los estilos predeterminados. lo sé muy bien, porque he estado tratando de cambiar los estilos predeterminados durante mes y medio. Créame es muy difícil porque los diferentes navegadores tienen diferentes etiquetas de entrada de carga. Así que use este para construir sus formularios de carga de archivos personalizados.Aquí está el código de CARGA AUTOMATIZADO completo.
<html>
<head>
<style>
#yourBtn{
   position: relative;
       top: 150px;
   font-family: calibri;
   width: 150px;
   padding: 10px;
   -webkit-border-radius: 5px;
   -moz-border-radius: 5px;
   border: 1px dashed #BBB;
   text-align: center;
   background-color: #DDD;
   cursor:pointer;
  }
</style>
<script type="text/javascript">
 function getFile(){
   document.getElementById("upfile").click();
 }
 function sub(obj){
    var file = obj.value;
    var fileName = file.split("\\");
    document.getElementById("yourBtn").innerHTML = fileName[fileName.length-1];
    document.myForm.submit();
    event.preventDefault();
  }
</script>
</head>
<body>
<center>
<form action="#type your action here" method="POST" enctype="multipart/form-data" name="myForm">
<div id="yourBtn" onclick="getFile()">click to upload a file</div>
<!-- this is your file input tag, so i hide it!-->
<!-- i used the onchange event to fire the form submission-->
<div style='height: 0px;width: 0px; overflow:hidden;'><input id="upfile" type="file" value="upload" onchange="sub(this)"/></div>
<!-- here you can have file submit button or you can write a simple script to upload the file automatically-->
<!-- <input type="submit" value='submit' > -->
</form>
</center>
</body>
</html>
Disfrute!
Que tenga un Buen Día,
Warning: date(): Invalid date.timezone value 'Europe/Kyiv', we selected the timezone 'UTC' for now. in /var/www/agent_stack/data/www/ajaxhispano.com/template/agent.layouts/content.php on line 61
2018-05-11 23:10:16
Escóndalo con css y usa un botón personalizado con selector(selector).haga clic en () para activar el botón examinar. a continuación, establezca un intervalo para comprobar el valor del tipo de entrada de archivo. el intervalo puede mostrar el valor para el usuario para que el usuario pueda ver lo que se está cargando. el intervalo se borrará cuando se envíe el formulario [EDITAR] Lo sentimos, he estado muy ocupado estaba significando actualizar este post, aquí hay un ejemplo
<form action="uploadScript.php" method="post" enctype="multipart/form-data">
<div>
    <!-- filename to display to the user -->
    <p id="file-name" class="margin-10 bold-10"></p>

    <!-- Hide this from the users view with css display:none; -->
    <input class="display-none" id="file-type" type="file" size="4" name="file"/>

    <!-- Style this button with type image or css whatever you wish -->
    <input id="browse-click" type="button" class="button" value="Browse for files"/>

    <!-- submit button -->
    <input type="submit" class="button" value="Change"/>
</div>
$(window).load(function () {
    var intervalFunc = function () {
        $('#file-name').html($('#file-type').val());
    };
    $('#browse-click').on('click', function () { // use .live() for older versions of jQuery
        $('#file-type').click();
        setInterval(intervalFunc, 1);
        return false;
    });
});
Warning: date(): Invalid date.timezone value 'Europe/Kyiv', we selected the timezone 'UTC' for now. in /var/www/agent_stack/data/www/ajaxhispano.com/template/agent.layouts/content.php on line 61
2013-04-26 12:55:38
HTML
<div class="new_Btn">SelectPicture</div><br>
<input id="html_btn" type='file'" /><br>
CSS
.new_Btn {
// your css propterties
}

#html_btn {
 display:none;
}
$('.new_Btn').bind("click" , function () {
        $('#html_btn').click();
    });
//edit: 6/20/2014: Be sure to use ".on" not ".bind" for newer versions of jQuery
Fiddle: http://jsfiddle.net/M7BXC /
También puede alcanzar sus objetivos sin jQuery con JavaScript normal.
Ahora el newBtn está enlazado con el html_btn y puedes estilizar tu nuevo btn como quieras: D
Warning: date(): Invalid date.timezone value 'Europe/Kyiv', we selected the timezone 'UTC' for now. in /var/www/agent_stack/data/www/ajaxhispano.com/template/agent.layouts/content.php on line 61
2014-06-20 23:33:40
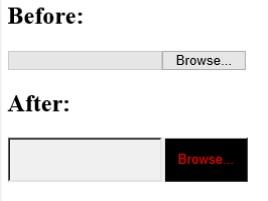
Todos los motores de renderizado generan automáticamente un botón cuando se crea un <input type="file">. Históricamente, ese botón ha sido completamente un-styleable. Sin embargo, Trident y WebKit han añadido hooks a través de pseudo-elementos.
Trident
A partir de IE10, el botón de entrada de archivo puede ser estilizado usando el pseudo-elemento ::-ms-browse. Básicamente, cualquier regla CSS que aplique a un botón normal se puede aplicar al pseudo-elemento. Para ejemplo:
::-ms-browse {
  background: black;
  color: red;
  padding: 1em;
}
<input type="file">Esto se muestra de la siguiente manera en IE10 en Windows 8:
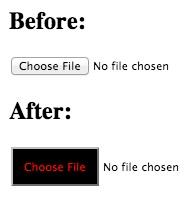
WebKit
WebKit proporciona un gancho para su botón de entrada de archivo con el pseudo-elemento ::-webkit-file-upload-button. Una vez más, casi cualquier regla CSS se puede aplicar, por lo tanto, el ejemplo Trident funcionará aquí también:
::-webkit-file-upload-button {
  background: black;
  color: red;
  padding: 1em;
}
<input type="file">Esto se muestra de la siguiente manera en Chrome 26 en OS X:
Warning: date(): Invalid date.timezone value 'Europe/Kyiv', we selected the timezone 'UTC' for now. in /var/www/agent_stack/data/www/ajaxhispano.com/template/agent.layouts/content.php on line 61
2016-10-04 18:03:47
 <label>
    <input type="file" />
 </label>
Puede envolver su input type="file" dentro de una etiqueta para la entrada. Dale estilo a la etiqueta como quieras y oculta la entrada con display: none;
Warning: date(): Invalid date.timezone value 'Europe/Kyiv', we selected the timezone 'UTC' for now. in /var/www/agent_stack/data/www/ajaxhispano.com/template/agent.layouts/content.php on line 61
2012-08-23 01:33:57
Si estás usando Bootstrap 3, esto funcionó para mí:
Véase http://www.abeautifulsite.net/whipping-file-inputs-into-shape-with-bootstrap-3 /
.btn-file {
  position: relative;
  overflow: hidden;
}
.btn-file input[type=file] {
  position: absolute;
  top: 0;
  right: 0;
  min-width: 100%;
  min-height: 100%;
  font-size: 100px;
  text-align: right;
  filter: alpha(opacity=0);
  opacity: 0;
  outline: none;
  background: white;
  cursor: inherit;
  display: block;
}
<link href="https://cdnjs.cloudflare.com/ajax/libs/twitter-bootstrap/3.3.7/css/bootstrap.min.css" rel="stylesheet" />
<span class="btn btn-primary btn-file">
Browse...<input type="file">
</span>Que produce el siguiente botón de entrada de archivo:

En serio, echa un vistazo http://www.abeautifulsite.net/whipping-file-inputs-into-shape-with-bootstrap-3 /
Warning: date(): Invalid date.timezone value 'Europe/Kyiv', we selected the timezone 'UTC' for now. in /var/www/agent_stack/data/www/ajaxhispano.com/template/agent.layouts/content.php on line 61
2016-08-18 17:35:54
Puedo hacerlo con CSS puro usando el siguiente código. He usado bootstrap y font-awesome.
<link href="https://cdnjs.cloudflare.com/ajax/libs/twitter-bootstrap/3.3.7/css/bootstrap.min.css" rel="stylesheet" />
<link href="https://cdnjs.cloudflare.com/ajax/libs/font-awesome/4.7.0/css/font-awesome.css" rel="stylesheet" />

<label class="btn btn-default btn-sm center-block btn-file">
  <i class="fa fa-upload fa-2x" aria-hidden="true"></i>
  <input type="file" style="display: none;">
</label>Warning: date(): Invalid date.timezone value 'Europe/Kyiv', we selected the timezone 'UTC' for now. in /var/www/agent_stack/data/www/ajaxhispano.com/template/agent.layouts/content.php on line 61
2016-12-30 08:14:15
Esto es simple con jquery. Para dar un ejemplo de código de La sugerencia de Ryan con una ligera modificación.
Html básico:
<div id="image_icon"></div>
<div id="filename"></div>
<input id="the_real_file_input" name="foobar" type="file">
Asegúrese de establecer el estilo en la entrada cuando esté listo: opacity: 0
No se puede establecer display: none porque necesita ser clicable. Pero puedes colocarlo debajo del botón" nuevo " o meterlo debajo de otra cosa con z-index si lo prefieres.
Configure un jquery para hacer clic en la entrada real cuando haga clic en la imagen.
$('#image_icon').click(function() {
    $('#the_real_file_input').click();
});
Ahora tu botón está funcionando. Simplemente corte y pegue el valor cuando se cambie.
$('input[type=file]').bind('change', function() {
    var str = "";
    str = $(this).val();
    $("#filename").text(str);
}).change();
Tah dah! Es posible que necesite analizar val () a algo más significativo, pero debería estar todo listo.
Warning: date(): Invalid date.timezone value 'Europe/Kyiv', we selected the timezone 'UTC' for now. in /var/www/agent_stack/data/www/ajaxhispano.com/template/agent.layouts/content.php on line 61
2017-05-23 12:10:44
TLDR; Ejemplo de trabajo aquí con soporte nativo de arrastrar y soltar: https://jsfiddle.net/ms3bbazv/4 /
Al estilizar una entrada de archivo, no debe romper ninguna interacción nativa la entrada proporciona.
El enfoque display: none rompe el soporte nativo de arrastrar y soltar.
Para no romper nada, debe usar el enfoque opacity: 0 para la entrada, y colocarla usando un patrón relativo / absoluto en una envoltura.
Usando esta técnica, puede diseñar fácilmente un clic / drop zone para el usuario, y añadir clase personalizada en javascript en el evento dragenter para actualizar los estilos y dar al usuario una retroalimentación que le permita ver que puede soltar un archivo.
HTML:
<label for="test">
  <div>Click or drop something here</div>
  <input type="file" id="test">
</label>
CSS:
input[type="file"] {
  position: absolute;
  left: 0;
  opacity: 0;
  top: 0;
  bottom: 0;
  width: 100%;
}

div {
  position: absolute;
  left: 0;
  top: 0;
  bottom: 0;
  width: 100%;
  display: flex;
  align-items: center;
  justify-content: center;
  background: #ccc;
  border: 3px dotted #bebebe;
  border-radius: 10px;
}

label {
  display: inline-block;
  position: relative;
  height: 100px;
  width: 400px;
}
Aquí hay un ejemplo de trabajo (con JS adicional para manejar dragover eventos y archivos soltados).
Https://jsfiddle.net/ms3bbazv/4 /
Espero que esto haya ayudado !
Warning: date(): Invalid date.timezone value 'Europe/Kyiv', we selected the timezone 'UTC' for now. in /var/www/agent_stack/data/www/ajaxhispano.com/template/agent.layouts/content.php on line 61
2018-02-06 14:16:53
VISIBILIDAD: truco oculto
Normalmente voy por el visibility:hidden truco
Este es mi botón de estilo
<div id="uploadbutton" class="btn btn-success btn-block">Upload</div>
Este es el botón input type=file. Observe la regla visibility:hidden
<input type="file" id="upload" style="visibility:hidden;">
Este es el bit de JavaScript para pegarlos. Funciona
<script>
 $('#uploadbutton').click(function(){
    $('input[type=file]').click();
 });
 </script>
Warning: date(): Invalid date.timezone value 'Europe/Kyiv', we selected the timezone 'UTC' for now. in /var/www/agent_stack/data/www/ajaxhispano.com/template/agent.layouts/content.php on line 61
2016-10-16 14:58:09
La única manera que se me ocurre es encontrar el botón con javascript después de que se renderice y asignarle un estilo
También puedes mirar esta valoración crítica
Warning: date(): Invalid date.timezone value 'Europe/Kyiv', we selected the timezone 'UTC' for now. in /var/www/agent_stack/data/www/ajaxhispano.com/template/agent.layouts/content.php on line 61
2009-02-21 10:41:05
<input type="file" name="media" style="display-none" onchange="document.media.submit()">
Normalmente usaría javascript simple para personalizar la etiqueta de entrada de archivo.Un campo de entrada oculto, al hacer clic en el botón,javascript llama al campo oculto, solución simple sin ningún css o montón de jquery.
<button id="file" onclick="$('#file').click()">Upload File</button>
Warning: date(): Invalid date.timezone value 'Europe/Kyiv', we selected the timezone 'UTC' for now. in /var/www/agent_stack/data/www/ajaxhispano.com/template/agent.layouts/content.php on line 61
2013-08-13 19:48:58
Aquí hay una solución que realmente no estiliza el elemento <input type="file" /> sino que usa un elemento <input type="file" /> encima de otros elementos (que pueden ser estilizados). El elemento <input type="file" /> no es realmente visible, por lo tanto, la ilusión general es de un control de carga de archivos muy bien diseñado.
Me encontré con este problema recientemente y a pesar de la gran cantidad de respuestas en el desbordamiento de pila, ninguno realmente parecía encajar en la factura. Al final, terminé personalizando esto para tener un simple y elegante solución.
También he probado esto en Firefox, IE (11, 10 & 9), Chrome y Opera, iPad y algunos dispositivos Android.
Aquí está el enlace JSFiddle - > http://jsfiddle.net/umhva747 /
$('input[type=file]').change(function(e) {
    $in = $(this);
    $in.next().html($in.val());

});

$('.uploadButton').click(function() {
    var fileName = $("#fileUpload").val();
    if (fileName) {
        alert(fileName + " can be uploaded.");
    }
    else {
        alert("Please select a file to upload");
    }
});
body {
background-color:Black;
}
div.upload {
background-color:#fff;
border: 1px solid #ddd;
border-radius:5px;
display:inline-block;
height: 30px;
padding:3px 40px 3px 3px;
position:relative;
width: auto;
}
div.upload:hover {
opacity:0.95;
}
div.upload input[type="file"] {
display: input-block;
width: 100%;
height: 30px;
opacity: 0;
cursor:pointer;
position:absolute;
left:0;
}
.uploadButton {
background-color: #425F9C;
border: none;
border-radius: 3px;
color: #FFF;
cursor:pointer;
display: inline-block;
height: 30px;
margin-right:15px;
width: auto;
padding:0 20px;
box-sizing: content-box;
}
.fileName {
font-family: Arial;
font-size:14px;
}
.upload + .uploadButton {
height:38px;
}<script src="https://ajax.googleapis.com/ajax/libs/jquery/1.9.1/jquery.min.js"></script>
<form action="" method="post" enctype="multipart/form-data">
<div class="upload">
<input type="button" class="uploadButton" value="Browse" />
<input type="file" name="upload" accept="image/*" id="fileUpload" />
<span class="fileName">Select file..</span>
</div>
<input type="button" class="uploadButton" value="Upload File" />
</form>Espero que esto ayude!!!
Warning: date(): Invalid date.timezone value 'Europe/Kyiv', we selected the timezone 'UTC' for now. in /var/www/agent_stack/data/www/ajaxhispano.com/template/agent.layouts/content.php on line 61
2015-01-30 20:35:47
Aquí hay una solución, que también muestra el nombre de archivo elegido: http://jsfiddle.net/raft9pg0/1 /
HTML:
<label for="file-upload" class="custom-file-upload">Chose file</label>
<input id="file-upload" type="file"/>
File: <span id="file-upload-value">-</span>
JS:
$(function() {
    $("input:file[id=file-upload]").change(function() {
        $("#file-upload-value").html( $(this).val() );
    });
});
CSS:
input[type="file"] {
    display: none;
}

.custom-file-upload {
      background: #ddd;
      border: 1px solid #aaa;
      border-top: 1px solid #ccc;
      border-left: 1px solid #ccc;
      -moz-border-radius: 3px;
      -webkit-border-radius: 3px;
      border-radius: 3px;
      color: #444;
      display: inline-block;
      font-size: 11px;
      font-weight: bold;
      text-decoration: none;
      text-shadow: 0 1px rgba(255, 255, 255, .75);
      cursor: pointer;
      margin-bottom: 20px;
      line-height: normal;
      padding: 8px 10px; }
Warning: date(): Invalid date.timezone value 'Europe/Kyiv', we selected the timezone 'UTC' for now. in /var/www/agent_stack/data/www/ajaxhispano.com/template/agent.layouts/content.php on line 61
2014-10-15 12:15:17
Esta semana también necesitaba personalizar el botón y mostrar el nombre del archivo seleccionado a un lado, así que después de leer algunas de las respuestas anteriores (Gracias por cierto) se me ocurrió la siguiente implementación:
HTML:
<div class="browse">
<label id="uploadBtn" class="custom-file-upload">Choose file
<input type="file" name="fileInput" id="fileInput" accept=".yaml" ngf-select ngf-change="onFileSelect($files)" />
</label>
<span>{{fileName}}</span>
</div>
CSS
   input[type='file'] {
    color: #a1bbd5;
    display: none;

}

.custom-file-upload {
    border: 1px solid #a1bbd5;
    display: inline-block;
    padding: 2px 8px;
    cursor: pointer;
}

label{
    color: #a1bbd5;
    border-radius: 3px;
}
Javascript (Angular)
app.controller('MainCtrl', function($scope) {

        $scope.fileName = 'No file chosen';

          $scope.onFileSelect = function ($files) {
          $scope.selectedFile = $files;
          $scope.fileName = $files[0].name;
    };
});
Básicamente estoy trabajando con ng-file-upload lib, Angular-wise Estoy vinculando el nombre del archivo a mi scope scope y dándole el valor inicial de 'No file chosen', también estoy vinculando la función onFileSelect () a mi así que cuando se selecciona un archivo, obtengo el nombre del archivo usando la API ng-upload y lo asigno al scope scope.fichero.
Warning: date(): Invalid date.timezone value 'Europe/Kyiv', we selected the timezone 'UTC' for now. in /var/www/agent_stack/data/www/ajaxhispano.com/template/agent.layouts/content.php on line 61
2015-07-13 09:06:33
Tal vez muchos awnsers. Pero me gusta esto en CSS puro con fa-buttons:
.divs {
    position: relative;
    display: inline-block;
    background-color: #fcc;
}

.inputs {
    position:absolute;
    left: 0px;
    height: 100%;
    width: 100%;
    opacity: 0;
    background: #00f;
    z-index:999;
}

.icons {
    position:relative;
}
<div class="divs">
<input type='file' id='image' class="inputs">
<i class="fa fa-image fa-2x icons"></i>
</div>
<div class="divs">
<input type='file' id='book' class="inputs">
<i class="fa fa-book fa-5x icons"></i>
</div>
<br><br><br>
<div class="divs">
<input type='file' id='data' class="inputs">
<i class="fa fa-id-card fa-3x icons"></i>
</div>
<link href="https://maxcdn.bootstrapcdn.com/font-awesome/4.7.0/css/font-awesome.min.css" rel="stylesheet"/>Warning: date(): Invalid date.timezone value 'Europe/Kyiv', we selected the timezone 'UTC' for now. in /var/www/agent_stack/data/www/ajaxhispano.com/template/agent.layouts/content.php on line 61
2017-07-16 17:06:37
Esta es una buena manera de hacerlo con la carga de archivos de material / angular. Podrías hacer lo mismo con un botón bootstrap.
Nota: Usé <a> en lugar de <button> esto permite que los eventos de clic se formen burbujas.
<label>
    <input type="file" (change)="setFile($event)" style="display:none" />

    <a mat-raised-button color="primary">
      <mat-icon>file_upload</mat-icon>
      Upload Document
    </a>

  </label>
Warning: date(): Invalid date.timezone value 'Europe/Kyiv', we selected the timezone 'UTC' for now. in /var/www/agent_stack/data/www/ajaxhispano.com/template/agent.layouts/content.php on line 61
2017-11-13 23:09:13
Aquí usamos un span para activar la entrada de tipo archivo y simplemente personalizamos ese span, por lo que podemos agregar cualquier estilo de esta manera.
Tenga en cuenta que usamos la etiqueta de entrada con la opción visibilidad:oculta y la activamos en el lapso.
.attachFileSpan{
color:#2b6dad;
cursor:pointer;
}
.attachFileSpan:hover{
text-decoration: underline;
}
<h3> Customized input of type file </h3>
<input id="myInput" type="file" style="visibility:hidden"/>
<span title="attach file" class="attachFileSpan" onclick="document.getElementById('myInput').click()">
Attach file
</span>Warning: date(): Invalid date.timezone value 'Europe/Kyiv', we selected the timezone 'UTC' for now. in /var/www/agent_stack/data/www/ajaxhispano.com/template/agent.layouts/content.php on line 61
2018-01-08 06:26:05
Css puede hacer mucho aquí... con un poco de engaño...
<div id='wrapper'>
  <input type='file' id='browse'>
</div>

#wrapper {
     width: 93px; /*play with this value */
     height: 28px; /*play with this value */
     background: url('browseBtn.png') 0 0 no-repeat;
     border:none;
     overflow:hidden;
}

#browse{
     margin-left:-145px; /*play with this value */
     opacity:0; /* set to .5 or something so you can better position it as an overlay then back to zero again after you're done */
     -ms-filter: "progid:DXImageTransform.Microsoft.Alpha(Opacity=0)";
     filter: progid:DXImageTransform.Microsoft.Alpha(Opacity=0);
}
::referencia::http://site-o-matic.net/?viewpost=19
-abadía
Warning: date(): Invalid date.timezone value 'Europe/Kyiv', we selected the timezone 'UTC' for now. in /var/www/agent_stack/data/www/ajaxhispano.com/template/agent.layouts/content.php on line 61
2012-06-20 21:16:48
He encontrado un método muy fácil para cambiar el botón de archivo a una imagen. Solo tienes que etiquetar una imagen y colocarla encima del botón archivo.
<html>
<div id="File button">
    <div style="position:absolute;">
        <!--This is your labeled image-->
        <label for="fileButton"><img src="ImageURL"></label>
    </div>
    <div>
        <input type="file" id="fileButton"/>
    </div>
</div>
</html>
Al hacer clic en la imagen etiquetada, seleccione el botón archivo.
Warning: date(): Invalid date.timezone value 'Europe/Kyiv', we selected the timezone 'UTC' for now. in /var/www/agent_stack/data/www/ajaxhispano.com/template/agent.layouts/content.php on line 61
2013-09-04 07:08:50
SOLO CSS
Utilice esta muy simple y FÁCIL
Html:
<label>Attach your screenshort</label>
                <input type="file" multiple class="choose">
Css:
.choose::-webkit-file-upload-button {
    color: white;
    display: inline-block;
    background: #1CB6E0;
    border: none;
    padding: 7px 15px;
    font-weight: 700;
    border-radius: 3px;
    white-space: nowrap;
    cursor: pointer;
    font-size: 10pt;
}
Warning: date(): Invalid date.timezone value 'Europe/Kyiv', we selected the timezone 'UTC' for now. in /var/www/agent_stack/data/www/ajaxhispano.com/template/agent.layouts/content.php on line 61
2016-06-03 13:00:08
No te dejes engañar por "grandes" soluciones CSS que son realmente muy específicas del navegador, o que superponen el botón de estilo en la parte superior del botón real, o que te obligan a usar un <label> en lugar de un <button>, o cualquier otro hack. JavaScript ES necesario para que funcione para el uso general. Por favor, estudia cómo gmail y DropZone lo hacen si no me crees.
Simplemente estile un botón normal como desee, luego llame a una función JS simple para crear y vincular un elemento de entrada oculto a su botón de estilo.
<!DOCTYPE html>
<meta charset="utf-8">

<style>
    button {
        width            : 160px;
        height           : 30px;
        font-size        : 13px;
        border           : none;
        text-align       : center;
        background-color : #444;
        color            : #6f0;
    }
    button:active {
        background-color : #779;
    }
</style>

<button id="upload">Styled upload button!</button>

<script>

function Upload_On_Click(id, handler) {
    var hidden_input = null;
    document.getElementById(id).onclick = function() {hidden_input.click();}
    function setup_hidden_input() {
        hidden_input && hidden_input.parentNode.removeChild(hidden_input);
        hidden_input = document.createElement("input");
        hidden_input.setAttribute("type", "file");
        hidden_input.style.visibility = "hidden";
        document.querySelector("body").appendChild(hidden_input);
        hidden_input.onchange = function() {
            handler(hidden_input.files[0]);
            setup_hidden_input();
        };
    }
    setup_hidden_input();
}

Upload_On_Click("upload", function(file) {
    console.log("GOT FILE: " + file.name);
});

</script>
Observe cómo el código anterior lo vuelve a enlazar después de cada vez que el usuario elige un archivo. Esto es importante porque "onchange" solo se llama si el usuario cambia el nombre del archivo. Pero es probable que desee obtener el archivo cada vez que el usuario lo proporciona.
Warning: date(): Invalid date.timezone value 'Europe/Kyiv', we selected the timezone 'UTC' for now. in /var/www/agent_stack/data/www/ajaxhispano.com/template/agent.layouts/content.php on line 61
2017-09-09 06:34:38
Aquí hay una solución simple de solo css, que crea un área de destino consistente y le permite diseñar sus elementos falsos como desee.
La idea básica es la siguiente:
- Tenga dos elementos "falsos" (una entrada de texto/enlace) como hermanos a su entrada de archivo real. Colóquelos absolutamente para que estén exactamente en la parte superior de su área objetivo.
- Envuelva su entrada de archivo con un div. Establezca desbordamiento en oculto (para que la entrada del archivo no se derrame), y hágalo exactamente del tamaño que desee área objetivo a ser.
- Establezca la opacidad en 0 en la entrada del archivo para que esté oculto pero aún se pueda hacer clic. Dale un tamaño de fuente grande para que pueda hacer clic en todas las partes del área de destino.
Aquí está el jsfiddle: http://jsfiddle.net/gwwar/nFLKU /
<form>
    <input id="faux" type="text" placeholder="Upload a file from your computer" />
    <a href="#" id="browse">Browse </a>
    <div id="wrapper">
        <input id="input" size="100" type="file" />
    </div>
</form>
Warning: date(): Invalid date.timezone value 'Europe/Kyiv', we selected the timezone 'UTC' for now. in /var/www/agent_stack/data/www/ajaxhispano.com/template/agent.layouts/content.php on line 61
2013-03-02 21:46:12
Una solución muy inteligente usando jQuery que funciona en todos los navegadores antiguos, así como en los nuevos, encontré aquí. Se encarga de todos los problemas de estilo y clic (), utilizando el botón de búsqueda de archivos real. Hice una versión simple de javascript: fiddle La solución es tan simple como un genio: hacer que el archivo de entrada invisible, y utilizar un pedazo de código para colocarlo debajo del mousecursor.
<div class="inp_field_12" onmousemove="file_ho(event,this,1)"><span>browse</span>
<input id="file_1" name="file_1" type="file" value="" onchange="file_ch(1)">
</div>
<div id="result_1" class="result"></div>


function file_ho(e, o, a) {
    e = window.event || e;
    var x = 0,
    y = 0;
    if (o.offsetParent) {
        do {
        x += o.offsetLeft;
        y += o.offsetTop;
        } while (o = o.offsetParent);
    }
var x1 = e.clientX || window.event.clientX;
var y1 = e.clientY || window.event.clientY;
var le = 100 - (x1 - x);
var to = 10 - (y1 - y);
document.getElementById('file_' + a).style.marginRight = le + 'px';
document.getElementById('file_' + a).style.marginTop = -to + 'px';
}

.inp_field_12 {
position:relative;
overflow:hidden;
float: left;
width: 130px;
height: 30px;
background: orange;
}
.inp_field_12 span {
position: absolute;
width: 130px;
font-family:'Calibri', 'Trebuchet MS', sans-serif;
font-size:17px;
line-height:27px;
text-align:center;
color:#555;
}
.inp_field_12 input[type='file'] {
cursor:pointer;
cursor:hand;
position: absolute;
top: 0px;
right: 0px;
-moz-opacity:0;
filter:alpha(opacity: 0);
opacity: 0;
outline: none;
outline-style:none;
outline-width:0;
ie-dummy: expression(this.hideFocus=true);
}
.inp_field_12:hover {
background-position:-140px -35px;
}
.inp_field_12:hover span {
color:#fff;
}
Warning: date(): Invalid date.timezone value 'Europe/Kyiv', we selected the timezone 'UTC' for now. in /var/www/agent_stack/data/www/ajaxhispano.com/template/agent.layouts/content.php on line 61
2017-05-23 12:34:44
En caso de que esté buscando una biblioteca javascript - solución lista para usar, jquery-fileinput funciona bien.
Warning: date(): Invalid date.timezone value 'Europe/Kyiv', we selected the timezone 'UTC' for now. in /var/www/agent_stack/data/www/ajaxhispano.com/template/agent.layouts/content.php on line 61
2013-11-25 21:15:41
Actualizar No importa, esto no funciona en IE o es nuevo hermano, FF. Funciona en cualquier otro tipo de elemento como se espera, pero no funciona en entradas de archivos. Una manera mucho mejor de hacer esto es simplemente crear una entrada de archivo y una etiqueta que enlace a ella. Haga que la pantalla de entrada de archivo ninguno y boom, funciona en IE9+ sin problemas.
Advertencia: Todo debajo de esto es una mierda!
Mediante el uso de pseudo elementos posicionados / dimensionados contra su contenedor, podemos salir adelante con un solo archivo de entrada (no se necesita marcado adicional), y estilo como de costumbre.
<input type="file" class="foo">

.foo {
    display: block;
    position: relative;
    width: 300px;
    margin: auto;
    cursor: pointer;
    border: 0;
    height: 60px;
    border-radius: 5px;
    outline: 0;
}
.foo:hover:after {
    background: #5978f8;
}
.foo:after {
    transition: 200ms all ease;
    border-bottom: 3px solid rgba(0,0,0,.2);
    background: #3c5ff4;
    text-shadow: 0 2px 0 rgba(0,0,0,.2);
    color: #fff;
    font-size: 20px;
    text-align: center;
    position: absolute;
    top: 0;
    left: 0;
    width: 100%;
    height: 100%;
    display: block;
    content: 'Upload Something';
    line-height: 60px;
    border-radius: 5px;
}
Disfrutar de los chicos!
Antigua actualización
Convirtió esto en un mixin Stylus. Debería ser lo suficientemente fácil para uno de ustedes cool SCSS gatos para convertirlo.
file-button(button_width = 150px)
  display block
  position relative
  margin auto
  cursor pointer
  border 0
  height 0
  width 0
  outline none
  &:after
    position absolute
    top 0
    text-align center
    display block
    width button_width
    left -(button_width / 2)
Uso:
<input type="file">

input[type="file"]
    file-button(200px)
Warning: date(): Invalid date.timezone value 'Europe/Kyiv', we selected the timezone 'UTC' for now. in /var/www/agent_stack/data/www/ajaxhispano.com/template/agent.layouts/content.php on line 61
2013-12-26 16:07:45
Como JGuo y CorySimmons mencionados, puede usar el comportamiento clickable de una etiqueta estilable, ocultando el elemento de entrada de archivo menos flexible.
<!DOCTYPE html>
<html>
<head>
<title>Custom file input</title>
<link rel="stylesheet" href="http://netdna.bootstrapcdn.com/bootstrap/3.1.1/css/bootstrap.min.css">
</head>

<body>

<label for="upload-file" class="btn btn-info"> Choose file... </label>
<input id="upload-file" type="file" style="display: none"
onchange="this.nextElementSibling.textContent = this.previousElementSibling.title = this.files[0].name">
<div></div>

</body>
</html>
Warning: date(): Invalid date.timezone value 'Europe/Kyiv', we selected the timezone 'UTC' for now. in /var/www/agent_stack/data/www/ajaxhispano.com/template/agent.layouts/content.php on line 61
2017-05-23 12:02:46
Estas respuestas son agradables, y todas funcionan para casos de uso muy específicos. Es decir, son obstinados.
Por lo tanto, aquí hay una respuesta que no asume nada, pero funcionará sin importar cómo lo modifique. Puede cambiar el diseño con css, agregar javascript para tal vez mostrar un nombre de archivo en el cambio, etc. siempre funcionará.
Código:
Aquí está el núcleo css
.file-input{
  pointer-events: none;
  position: relative;
  overflow: hidden;
}
.file-input > * {
  pointer-events: none;
}
.file-input > input[type="file"]{
  position: absolute;
  top: 0;
  right: 0;
  bottom: 0;
  left: 0;
  opacity: 0;
  pointer-events: all;
  cursor: pointer;
  height: 100%;
  width: 100%;
}
Y el núcleo html:
<div class="file-input">
  <input type="file"/>
</div>
Como puede ver, estamos forzando cualquier puntero evento(clic) que sucede en el .file-input elemento, o cualquiera de sus hijos, que se proxy a la entrada de archivo. Esto se debe a que la entrada de archivo se coloca absoluta y consumirá siempre el ancho/alto del contenedor. Por lo tanto, puede personalizar para adaptarse a sus necesidades. estilo de la envoltura en un botón, utilice algunos js para mostrar el nombre del archivo en seleccionar, etc. nada se romperá mientras el código principal anterior permanezca intacto.
Como verá en la demo, he agregado un span con el texto " Seleccionar file " y una clase con estilos adicionales para dar estilo al div .file-input. Este debería ser el punto de partida canónico para cualquier persona que pretenda crear un elemento personalizado de carga de archivos.
Demo:JSFIDDLE
Warning: date(): Invalid date.timezone value 'Europe/Kyiv', we selected the timezone 'UTC' for now. in /var/www/agent_stack/data/www/ajaxhispano.com/template/agent.layouts/content.php on line 61
2017-04-04 22:16:56