Expandir / Contraer Animación de barra de herramientas Lollipop (aplicación Telegram)
Estoy tratando de averiguar cómo se realiza la animación expand/collapse de la barra de herramientas. Si echas un vistazo a la configuración de la aplicación Telegram, verás que hay una vista de lista y la barra de herramientas. Cuando se desplaza hacia abajo, la barra de herramientas se contrae y cuando se desplaza hacia arriba se expande. También está la animación de la foto de perfil y la FAB. ¿Alguien tiene alguna pista sobre eso? ¿Crees que construyeron todas las animaciones encima? Tal vez me estoy perdiendo algo de las nuevas API o el soporte biblioteca.
Noté el mismo comportamiento en la aplicación Google Calendar, cuando abres el Spinner (no creo que sea un spinner, pero parece): La barra de herramientas se expande y cuando te desplazas hacia arriba, se colapsa.
Solo para aclarar: No necesito el método QuickReturn. Sé que probablemente la aplicación Telegram está usando algo similar. El método exacto que necesito es el efecto de la aplicación Google Calendar. He intentado con
android:animateLayoutChanges="true"
Y el método expand funciona bastante bien. Pero obviamente, Si Me desplazo hacia arriba en la vista de lista, la barra de herramientas no se colapsa.
También he pensado en agregar un GestureListener pero quiero saber si hay alguna API o métodos más simples para lograr esto.
Si no hay ninguno, creo que iré con el GestureListener. Con suerte para tener un efecto suave de la animación.
Gracias!
4 answers
Editar:
Desde el lanzamiento de la biblioteca de soporte de diseño de Android, hay una solución más fácil. Compruebe la respuesta de Joaquín
--
Así es como lo hice, probablemente hay muchas otras soluciones, pero esta funcionó para mí.
-
En primer lugar, hay que utilizar un
Toolbarcon un fondo transparente. El expanding & collapsingToolbares en realidad un falso que está debajo del transparenteToolbar. (se puede ver en el primera captura de pantalla a continuación-la de los márgenes-que también es así como lo hicieron en Telegram).Solo mantenemos el
Toolbarreal para elNavigationIcony el desbordamientoMenuItem.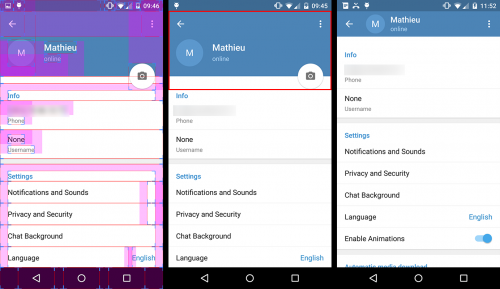
-
Todo lo que está en el rectángulo rojo en la segunda captura de pantalla (es decir, el falso
Toolbary elFloatingActionButton) es en realidad un encabezado que se agrega a la configuraciónListView(oScrollView).Por lo tanto, debe crear un diseño para este encabezado en un archivo separado que pueda mira así:
 <!-- The headerView layout. Includes the fake Toolbar & the FloatingActionButton -->

 <FrameLayout xmlns:android="http://schemas.android.com/apk/res/android"
    android:layout_width="match_parent"
    android:layout_height="wrap_content">

    <RelativeLayout
        android:id="@+id/header_container"
        android:layout_width="match_parent"
        android:layout_height="@dimen/header_height"
        android:layout_marginBottom="3dp"
        android:background="@android:color/holo_blue_dark">

        <RelativeLayout
            android:id="@+id/header_infos_container"
            android:layout_width="match_parent"
            android:layout_height="wrap_content"
            android:layout_alignParentBottom="true"
            android:padding="16dp">

            <ImageView
                android:id="@+id/header_picture"
                android:layout_width="wrap_content"
                android:layout_height="wrap_content"
                android:layout_centerVertical="true"
                android:layout_marginRight="8dp"
                android:src="@android:drawable/ic_dialog_info" />

            <TextView
                android:id="@+id/header_title"
                style="@style/TextAppearance.AppCompat.Title"
                android:layout_width="wrap_content"
                android:layout_height="wrap_content"
                android:layout_toRightOf="@+id/header_picture"
                android:text="Toolbar Title"
                android:textColor="@android:color/white" />

            <TextView
                android:id="@+id/header_subtitle"
                style="@style/TextAppearance.AppCompat.Subhead"
                android:layout_width="wrap_content"
                android:layout_height="wrap_content"
                android:layout_below="@+id/header_title"
                android:layout_toRightOf="@+id/header_picture"
                android:text="Toolbar Subtitle"
                android:textColor="@android:color/white" />

        </RelativeLayout>
    </RelativeLayout>

    <FloatingActionButton
        android:id="@+id/header_fab"
        android:layout_width="wrap_content"
        android:layout_height="wrap_content"
        android:layout_gravity="bottom|right"
        android:layout_margin="10dp"
        android:src="@drawable/ic_open_in_browser"/>

</FrameLayout>
(Tenga en cuenta que puede usar márgenes/relleno negativos para que la fab esté a horcajadas 2
Views) -
Ahora viene la parte interesante. Para animar la expansión de nuestro fake
Toolbar, implementamos elListViewonScrollListener.// The height of your fully expanded header view (same than in the xml layout) int headerHeight = getResources().getDimensionPixelSize(R.dimen.header_height); // The height of your fully collapsed header view. Actually the Toolbar height (56dp) int minHeaderHeight = getResources().getDimensionPixelSize(R.dimen.action_bar_height); // The left margin of the Toolbar title (according to specs, 72dp) int toolbarTitleLeftMargin = getResources().getDimensionPixelSize(R.dimen.toolbar_left_margin); // Added after edit int minHeaderTranslation; private ListView listView; // Header views private View headerView; private RelativeLayout headerContainer; private TextView headerTitle; private TextView headerSubtitle; private FloatingActionButton headerFab; @Override public View onCreateView(LayoutInflater inflater, ViewGroup container, Bundle savedInstanceState) { View rootView = inflater.inflate(R.layout.listview_fragment, container, false); listView = rootView.findViewById(R.id.listview); // Init the headerHeight and minHeaderTranslation values headerHeight = getResources().getDimensionPixelSize(R.dimen.header_height); minHeaderTranslation = -headerHeight + getResources().getDimensionPixelOffset(R.dimen.action_bar_height); // Inflate your header view headerView = inflater.inflate(R.layout.header_view, listview, false); // Retrieve the header views headerContainer = (RelativeLayout) headerView.findViewById(R.id.header_container); headerTitle = (TextView) headerView.findViewById(R.id.header_title); headerSubtitle = (TextView) headerView.findViewById(R.id.header_subtitle); headerFab = (TextView) headerView.findViewById(R.id.header_fab);; // Add the headerView to your listView listView.addHeaderView(headerView, null, false); // Set the onScrollListener listView.setOnScrollListener(this); // ... return rootView; } @Override public void onScrollStateChanged(AbsListView view, int scrollState) { // Do nothing } @Override public void onScroll(AbsListView view, int firstVisibleItem, int visibleItemCount, int totalItemCount) { Integer scrollY = getScrollY(view); // This will collapse the header when scrolling, until its height reaches // the toolbar height headerView.setTranslationY(Math.max(0, scrollY + minHeaderTranslation)); // Scroll ratio (0 <= ratio <= 1). // The ratio value is 0 when the header is completely expanded, // 1 when it is completely collapsed float offset = 1 - Math.max( (float) (-minHeaderTranslation - scrollY) / -minHeaderTranslation, 0f); // Now that we have this ratio, we only have to apply translations, scales, // alpha, etc. to the header views // For instance, this will move the toolbar title & subtitle on the X axis // from its original position when the ListView will be completely scrolled // down, to the Toolbar title position when it will be scrolled up. headerTitle.setTranslationX(toolbarTitleLeftMargin * offset); headerSubtitle.setTranslationX(toolbarTitleLeftMargin * offset); // Or we can make the FAB disappear when the ListView is scrolled headerFab.setAlpha(1 - offset); } // Method that allows us to get the scroll Y position of the ListView public int getScrollY(AbsListView view) { View c = view.getChildAt(0); if (c == null) return 0; int firstVisiblePosition = view.getFirstVisiblePosition(); int top = c.getTop(); int headerHeight = 0; if (firstVisiblePosition >= 1) headerHeight = this.headerHeight; return -top + firstVisiblePosition * c.getHeight() + headerHeight; }
Tenga en cuenta que hay algunas partes de este código que no probé, así que siéntase libre de resaltar los errores. Pero en general, sé que esta solución funciona, aunque estoy seguro de que puede ser mejorar.
EDITAR 2:
Hubo algunos errores en el código anterior (que no probé hasta hoy...), así que cambié algunas líneas para que funcionara :
- Introduje otra variable, minHeaderTranslation, que reemplazó a minHeaderHeight; {[41]]}
-
Cambié el valor de traducción Y aplicado a la vista de encabezado desde :
headerView.setTranslationY(Math.max(-scrollY, minHeaderTranslation));A:
headerView.setTranslationY(Math.max(0, scrollY + minHeaderTranslation));La expresión anterior no funcionaba en absoluto, lo siento por que...
El cálculo de la proporción también cambió, de modo que ahora evoluciona desde la parte inferior de la barra de herramientas (en lugar de la parte superior de la pantalla) a la cabecera expandida completa.
Warning: date(): Invalid date.timezone value 'Europe/Kyiv', we selected the timezone 'UTC' for now. in /var/www/agent_stack/data/www/ajaxhispano.com/template/agent.layouts/content.php on line 61
2017-05-23 12:34:45
También echa un vistazo CollapsingTitleLayout escrito por Chris Banes en Android team:
https://plus.google.com / + ChrisBanes / posts / J9Fwbc15BHN

Código: https://gist.github.com/chrisbanes/91ac8a20acfbdc410a68
Warning: date(): Invalid date.timezone value 'Europe/Kyiv', we selected the timezone 'UTC' for now. in /var/www/agent_stack/data/www/ajaxhispano.com/template/agent.layouts/content.php on line 61
2015-05-24 02:20:12
Use la biblioteca de soporte de diseño http://android-developers.blogspot.in/2015/05/android-design-support-library.html
Incluya esto en la compilación.gradle
compile 'com.android.support:design:22.2.0'
compile 'com.android.support:appcompat-v7:22.2.+'
Para la vista recycler incluya esto también
compile 'com.android.support:recyclerview-v7:22.2.0'
    <!-- AppBarLayout allows your Toolbar and other views (such as tabs provided by TabLayout)
    to react to scroll events in a sibling view marked with a ScrollingViewBehavior.-->
    <android.support.design.widget.AppBarLayout
        android:id="@+id/appbar"
        android:layout_width="match_parent"
        android:layout_height="wrap_content"
        android:fitsSystemWindows="true">

        <!-- specify tag app:layout_scrollFlags -->
        <android.support.v7.widget.Toolbar
            android:id="@+id/toolbar"
            android:layout_width="match_parent"
            android:layout_height="?attr/actionBarSize"
            android:background="?attr/colorPrimary"
            app:layout_scrollFlags="scroll|enterAlways"/>

        <!-- specify tag app:layout_scrollFlags -->
        <android.support.design.widget.TabLayout
            android:id="@+id/tabLayout"
            android:scrollbars="horizontal"
            android:layout_below="@+id/toolbar"
            android:layout_width="match_parent"
            android:layout_height="wrap_content"
            android:background="?attr/colorPrimary"
            app:layout_scrollFlags="scroll|enterAlways"/>

        <!--  app:layout_collapseMode="pin" will help to pin this view at top when scroll -->
        <TextView
            android:layout_width="match_parent"
            android:layout_height="50dp"
            android:text="Title"
            android:gravity="center"
            app:layout_collapseMode="pin" />

    </android.support.design.widget.AppBarLayout>

    <!-- This will be your scrolling view.
    app:layout_behavior="@string/appbar_scrolling_view_behavior" tag connects this features -->
    <android.support.v7.widget.RecyclerView
        android:id="@+id/list"
        app:layout_behavior="@string/appbar_scrolling_view_behavior"
        android:layout_width="match_parent"
        android:layout_height="match_parent">

    </android.support.v7.widget.RecyclerView>

</android.support.design.widget.CoordinatorLayout>
Su actividad debe extender AppCompatActivity
public class YourActivity extends AppCompatActivity {

    @Override
    protected void onCreate(Bundle savedInstanceState) {
        super.onCreate(savedInstanceState);
        setContentView(R.layout.your_layout);

        //set toolbar
        Toolbar toolbar = (Toolbar) findViewById(R.id.toolbar);
        setSupportActionBar(toolbar);
    }

}
El tema de la aplicación debe ser así
    <resources>
            <!-- Base application theme. -->
            <style name="AppTheme" parent="Theme.AppCompat.NoActionBar">
            </style>
    </resources>
Warning: date(): Invalid date.timezone value 'Europe/Kyiv', we selected the timezone 'UTC' for now. in /var/www/agent_stack/data/www/ajaxhispano.com/template/agent.layouts/content.php on line 61
2015-07-03 12:32:20
Esta es mi implementación:
collapsedHeaderHeight y expandedHeaderHeight se definen en otro lugar, con la función getAnimationProgress puedo obtener el progreso de Expandir/Contraer, basándome en este valor hago mi animación y muestro/oculto el encabezado real.
  listForumPosts.setOnScrollListener(new AbsListView.OnScrollListener() {

        /**
         * @return [0,1], 0 means header expanded, 1 means header collapsed
         */
        private float getAnimationProgress(AbsListView view, int firstVisibleItem) {
            if (firstVisibleItem > 0)
                return 1;

            // should not exceed 1
            return Math.min(
                    -view.getChildAt(0).getTop() / (float) (expandedHeaderHeight - collapsedHeaderHeight), 1);
        }

        @Override
        public void onScroll(AbsListView view, int firstVisibleItem, int visibleItemCount, int totalItemCount) {
            // at render beginning, the view could be empty!
            if (view.getChildCount() > 0) {
                float animationProgress = getAnimationProgress(view, firstVisibleItem);
                imgForumHeaderAvatar.setAlpha(1-animationProgress);
                if (animationProgress == 1) {
                    layoutForumHeader.setVisibility(View.VISIBLE);
                } else {
                    layoutForumHeader.setVisibility(View.GONE);
                }
            }
        }

        @Override
        public void onScrollStateChanged(AbsListView view, int scrollState) {
            // do nothing
        }

    }
Warning: date(): Invalid date.timezone value 'Europe/Kyiv', we selected the timezone 'UTC' for now. in /var/www/agent_stack/data/www/ajaxhispano.com/template/agent.layouts/content.php on line 61
2015-02-03 22:15:58