Tintado de MenuItem en la barra de herramientas AppCompat
Cuando uso elementos de diseño de la biblioteca AppCompat para mis elementos de menú Toolbar, el teñido funciona como se esperaba. Así:
<item
    android:id="@+id/action_clear"
    android:icon="@drawable/abc_ic_clear_mtrl_alpha"  <-- from AppCompat
    android:title="@string/clear" />
Pero si puedo usar mi propio dibujables o incluso copiar la dibujables de la AppCompat biblioteca para mi propio proyecto no matiz en todo.
<item
    android:id="@+id/action_clear"
    android:icon="@drawable/abc_ic_clear_mtrl_alpha_copy"  <-- copy from AppCompat
    android:title="@string/clear" />
¿Hay alguna magia especial en el AppCompat Toolbar ¿eso solo tiñe los elementos de diseño de esa biblioteca? ¿Alguna forma de hacer que esto funcione con mis propios elementos de diseño?
Ejecutando esto en un dispositivo de nivel de API 19 con compileSdkVersion = 21 y targetSdkVersion = 21, y también usando todo desde AppCompat
abc_ic_clear_mtrl_alpha_copy es una copia exacta del png abc_ic_clear_mtrl_alpha de AppCompat
Editar:
El tinte se basa en el valor que he establecido para android:textColorPrimary en mi tema.
Por ejemplo <item name="android:textColorPrimary">#00FF00</item> me daría un color verde.
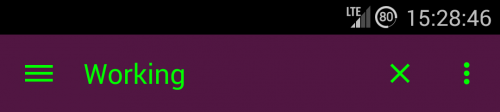
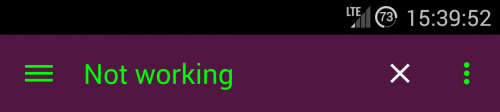
Capturas de pantalla
El teñido funciona como se espera con drawable de AppCompat
El tintado no funciona con un elemento de diseño copiado de AppCompat
6 answers
Porque si echas un vistazo al código fuente de TintManager en AppCompat, verás:
/**
 * Drawables which should be tinted with the value of {@code R.attr.colorControlNormal},
 * using the default mode.
 */
private static final int[] TINT_COLOR_CONTROL_NORMAL = {
        R.drawable.abc_ic_ab_back_mtrl_am_alpha,
        R.drawable.abc_ic_go_search_api_mtrl_alpha,
        R.drawable.abc_ic_search_api_mtrl_alpha,
        R.drawable.abc_ic_commit_search_api_mtrl_alpha,
        R.drawable.abc_ic_clear_mtrl_alpha,
        R.drawable.abc_ic_menu_share_mtrl_alpha,
        R.drawable.abc_ic_menu_copy_mtrl_am_alpha,
        R.drawable.abc_ic_menu_cut_mtrl_alpha,
        R.drawable.abc_ic_menu_selectall_mtrl_alpha,
        R.drawable.abc_ic_menu_paste_mtrl_am_alpha,
        R.drawable.abc_ic_menu_moreoverflow_mtrl_alpha,
        R.drawable.abc_ic_voice_search_api_mtrl_alpha,
        R.drawable.abc_textfield_search_default_mtrl_alpha,
        R.drawable.abc_textfield_default_mtrl_alpha
};

/**
 * Drawables which should be tinted with the value of {@code R.attr.colorControlActivated},
 * using the default mode.
 */
private static final int[] TINT_COLOR_CONTROL_ACTIVATED = {
        R.drawable.abc_textfield_activated_mtrl_alpha,
        R.drawable.abc_textfield_search_activated_mtrl_alpha,
        R.drawable.abc_cab_background_top_mtrl_alpha
};

/**
 * Drawables which should be tinted with the value of {@code android.R.attr.colorBackground},
 * using the {@link android.graphics.PorterDuff.Mode#MULTIPLY} mode.
 */
private static final int[] TINT_COLOR_BACKGROUND_MULTIPLY = {
        R.drawable.abc_popup_background_mtrl_mult,
        R.drawable.abc_cab_background_internal_bg,
        R.drawable.abc_menu_hardkey_panel_mtrl_mult
};

/**
 * Drawables which should be tinted using a state list containing values of
 * {@code R.attr.colorControlNormal} and {@code R.attr.colorControlActivated}
 */
private static final int[] TINT_COLOR_CONTROL_STATE_LIST = {
        R.drawable.abc_edit_text_material,
        R.drawable.abc_tab_indicator_material,
        R.drawable.abc_textfield_search_material,
        R.drawable.abc_spinner_mtrl_am_alpha,
        R.drawable.abc_btn_check_material,
        R.drawable.abc_btn_radio_material
};

/**
 * Drawables which contain other drawables which should be tinted. The child drawable IDs
 * should be defined in one of the arrays above.
 */
private static final int[] CONTAINERS_WITH_TINT_CHILDREN = {
        R.drawable.abc_cab_background_top_material
};
Lo que significa que tienen recursos específicos en la lista blanca para ser teñidos.
Pero supongo que siempre se puede ver cómo están tiñendo esas imágenes y hacer lo mismo. Es tan fácil como configurar el filtro de color en un elemento de diseño.
Warning: date(): Invalid date.timezone value 'Europe/Kyiv', we selected the timezone 'UTC' for now. in /var/www/agent_stack/data/www/ajaxhispano.com/template/agent.layouts/content.php on line 61
2014-11-08 14:05:38
Establecer un ColorFilter (tinte) en un MenuItem es simple. He aquí un ejemplo:
Drawable drawable = menuItem.getIcon();
if (drawable != null) {
    // If we don't mutate the drawable, then all drawable's with this id will have a color
    // filter applied to it.
    drawable.mutate();
    drawable.setColorFilter(color, PorterDuff.Mode.SRC_ATOP);
    drawable.setAlpha(alpha);
}
El código anterior es muy útil si desea admitir diferentes temas y no desea tener copias adicionales solo por el color o la transparencia.
Haga clic aquí para que una clase auxiliar establezca un ColorFilter en todos los elementos de diseño de un menú, incluido el icono de desbordamiento.
En onCreateOptionsMenu(Menu menu) simplemente llame a MenuColorizer.colorMenu(this, menu, color); después de inflar su menú y voila; sus iconos están teñidos.
Warning: date(): Invalid date.timezone value 'Europe/Kyiv', we selected the timezone 'UTC' for now. in /var/www/agent_stack/data/www/ajaxhispano.com/template/agent.layouts/content.php on line 61
2015-01-19 09:21:34
Después de la nueva biblioteca de soporte v22.1, puede usar algo similar a esto:
  @Override
    public boolean onCreateOptionsMenu(Menu menu) {
        getMenuInflater().inflate(R.menu.menu_home, menu);
        Drawable drawable = menu.findItem(R.id.action_clear).getIcon();

        drawable = DrawableCompat.wrap(drawable);
        DrawableCompat.setTint(drawable, ContextCompat.getColor(this,R.color.textColorPrimary));
        menu.findItem(R.id.action_clear).setIcon(drawable);
        return true;
    }
Warning: date(): Invalid date.timezone value 'Europe/Kyiv', we selected the timezone 'UTC' for now. in /var/www/agent_stack/data/www/ajaxhispano.com/template/agent.layouts/content.php on line 61
2016-11-14 06:13:25
Personalmente preferí este enfoque desde este enlace
Cree un diseño XML con lo siguiente:
<?xml version="1.0" encoding="utf-8"?>
<bitmap
    xmlns:android="http://schemas.android.com/apk/res/android"
    android:src="@drawable/ic_action_something"
    android:tint="@color/color_action_icons_tint"/>
Y haga referencia a este elemento de diseño desde su menú:
<item
    android:id="@+id/option_menu_item_something"
    android:icon="@drawable/ic_action_something_tined"
Warning: date(): Invalid date.timezone value 'Europe/Kyiv', we selected the timezone 'UTC' for now. in /var/www/agent_stack/data/www/ajaxhispano.com/template/agent.layouts/content.php on line 61
2015-09-29 06:40:13
La mayoría de las soluciones en este subproceso utilizan una API más reciente, o utilizan reflexión, o utilizan una búsqueda intensiva de vistas para llegar a la MenuItem inflada.
Sin embargo, hay un enfoque más elegante para hacer eso. Necesita una barra de herramientas personalizada, ya que su caso de uso "aplicar tinte personalizado" no funciona bien con la API pública de estilo/tematización.
public class MyToolbar extends Toolbar {
    ... some constructors, extracting mAccentColor from AttrSet, etc

    @Override
    public void inflateMenu(@MenuRes int resId) {
        super.inflateMenu(resId);
        Menu menu = getMenu();
        for (int i = 0; i < menu.size(); i++) {
            MenuItem item = menu.getItem(i);
            Drawable icon = item.getIcon();
            if (icon != null) {
                item.setIcon(applyTint(icon));
            }
        }
    }
    void applyTint(Drawable icon){
        icon.setColorFilter(
           new PorterDuffColorFilter(mAccentColor, PorterDuff.Mode.SRC_IN)
        );
    }

}
Solo asegúrese de llamar a su código de Actividad / Fragmento:
toolbar.inflateMenu(R.menu.some_menu);
toolbar.setOnMenuItemClickListener(someListener);
Sin reflexión, sin búsqueda de vistas, y no tanto código, ¿eh?
Y ahora tú puede ignorar lo ridículo onCreateOptionsMenu/onOptionsItemSelected.
Warning: date(): Invalid date.timezone value 'Europe/Kyiv', we selected the timezone 'UTC' for now. in /var/www/agent_stack/data/www/ajaxhispano.com/template/agent.layouts/content.php on line 61
2018-03-27 14:12:28
Aquí está la solución que uso; puede llamarla después de onPrepareOptionsMenu() o el lugar equivalente. La razón de mutate () es que si utilizas los iconos en más de una ubicación; sin mutate, todos tomarán el mismo tinte.
public class MenuTintUtils {
    public static void tintAllIcons(Menu menu, final int color) {
        for (int i = 0; i < menu.size(); ++i) {
            final MenuItem item = menu.getItem(i);
            tintMenuItemIcon(color, item);
            tintShareIconIfPresent(color, item);
        }
    }

    private static void tintMenuItemIcon(int color, MenuItem item) {
        final Drawable drawable = item.getIcon();
        if (drawable != null) {
            final Drawable wrapped = DrawableCompat.wrap(drawable);
            drawable.mutate();
            DrawableCompat.setTint(wrapped, color);
            item.setIcon(drawable);
        }
    }

    private static void tintShareIconIfPresent(int color, MenuItem item) {
        if (item.getActionView() != null) {
            final View actionView = item.getActionView();
            final View expandActivitiesButton = actionView.findViewById(R.id.expand_activities_button);
            if (expandActivitiesButton != null) {
                final ImageView image = (ImageView) expandActivitiesButton.findViewById(R.id.image);
                if (image != null) {
                    final Drawable drawable = image.getDrawable();
                    final Drawable wrapped = DrawableCompat.wrap(drawable);
                    drawable.mutate();
                    DrawableCompat.setTint(wrapped, color);
                    image.setImageDrawable(drawable);
                }
            }
        }
    }
}
Esto no se encargará del desbordamiento, pero para eso, puedes hacer esto:
Disposición:
<android.support.v7.widget.Toolbar
    ...
    android:theme="@style/myToolbarTheme" />
Estilos:
<style name="myToolbarTheme">
        <item name="colorControlNormal">#FF0000</item>
</style>
Esto funciona a partir de appcompat v23.1.0.
Warning: date(): Invalid date.timezone value 'Europe/Kyiv', we selected the timezone 'UTC' for now. in /var/www/agent_stack/data/www/ajaxhispano.com/template/agent.layouts/content.php on line 61
2015-11-13 16:41:05